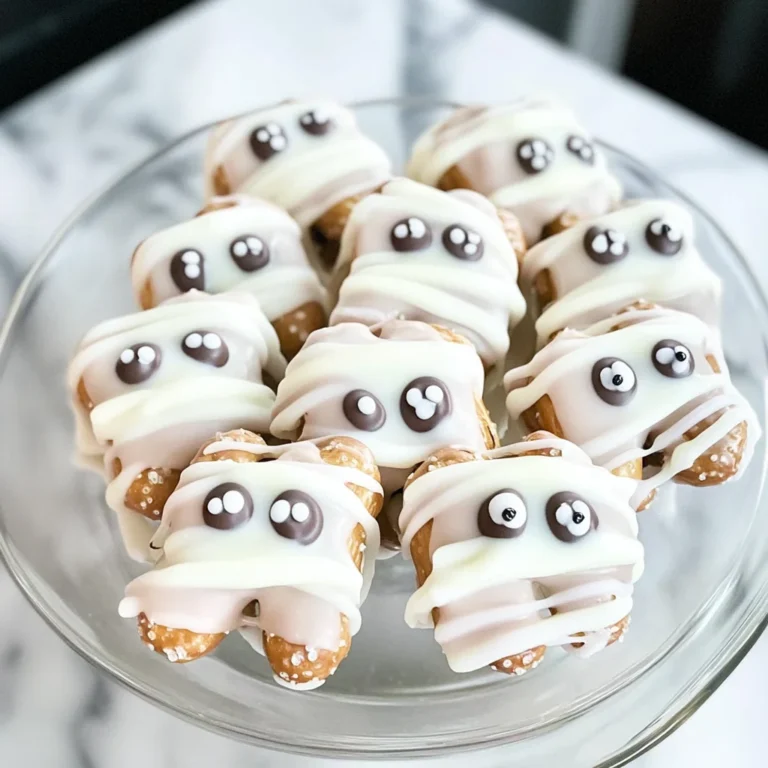
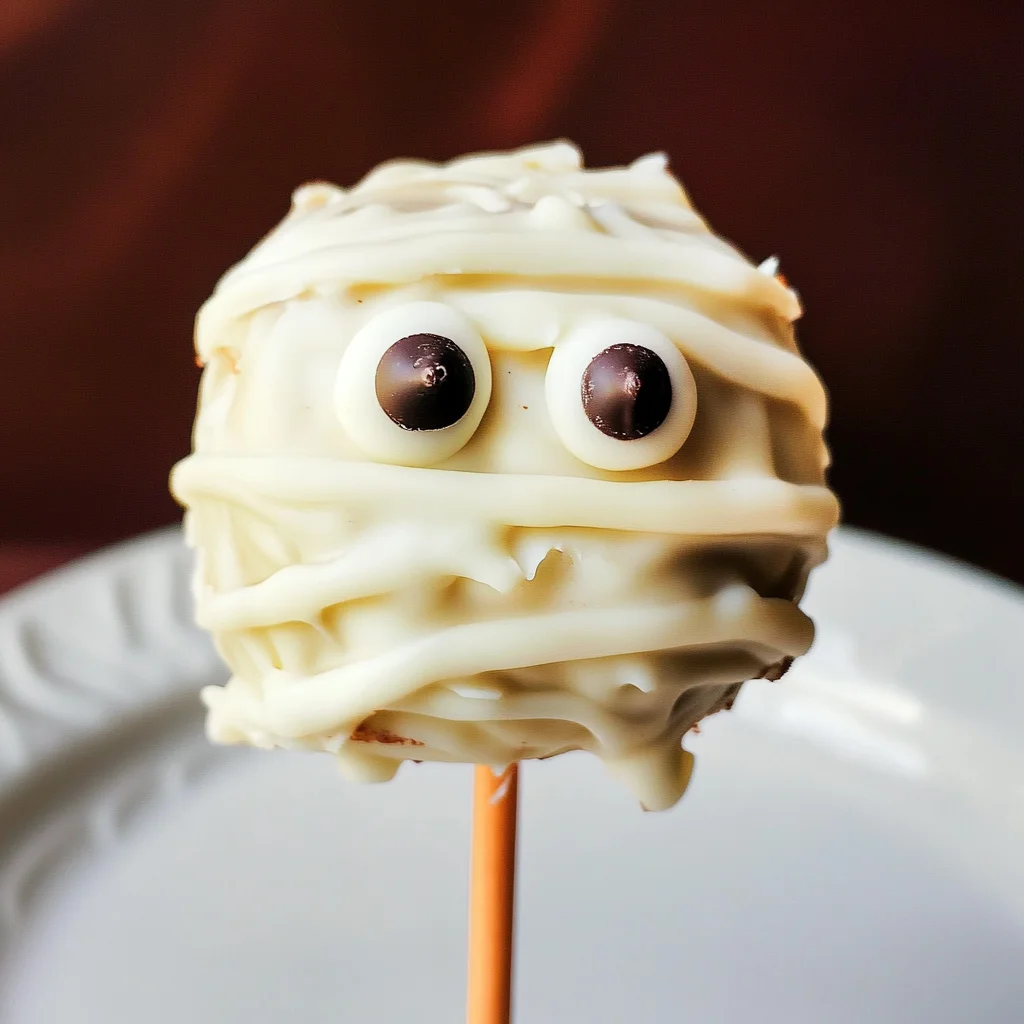
Mummy Pops
If you’re looking for a fun and festive treat that’s sure to impress both kids and adults, you’ve stumbled upon the perfect recipe! These Mummy Pops are not just adorable; they’re also ridiculously delicious. Made with rich dark chocolate brownies and creamy filling, then dipped in white chocolate, they capture all the flavors of Halloween in one delightful bite. Plus, they make for a fantastic dessert at family gatherings or spooky parties, bringing smiles all around.
What I love most about these Mummy Pops is how easy they are to whip up. You can even prepare the brownie mix a day in advance, which makes your Halloween festivities feel even more manageable. Trust me, once you see how excited everyone gets when they spot these cute little mummies on a stick, you’ll be making them every year!
Why You’ll Love This Recipe
- Easy to Make: With just a few simple steps, you’ll have these adorable treats ready in no time.
- Family-Friendly Fun: Kids will love helping out—especially when it comes to decorating the mummies!
- Make-Ahead Convenience: Prepare the brownies a day in advance for stress-free entertaining.
- Deliciously Decadent: The combination of chocolate brownie and creamy white chocolate is simply irresistible.
- Perfect for Any Occasion: Whether it’s Halloween or just a fun family night, these pops are always a hit!
Ingredients You’ll Need
Gathering your ingredients is half the fun! These Mummy Pops require simple and wholesome components that you probably already have at home. Let’s check out what you need to create these delightful treats.
For the Brownie Base
- 1 (17.8-ounce) box Betty Crocker Supreme Triple Chunk Brownie Mix
- 1 large egg
- 1/4 cup water
- 1/3 cup canola oil
- Cooking spray
For the Filling and Coating
- 4 ounces cream cheese
- 3 cups white chocolate chips (or 18 ounces of a white chocolate bar)
- 30 mini chocolate chips
Variations
One of the best parts about making Mummy Pops is that you can get creative with them! Here are a few fun variations to consider:
- Swap the Filling: Try using flavored cream cheese or even peanut butter for a tasty twist.
- Change Up the Coating: Instead of white chocolate, experiment with milk or dark chocolate for different flavors.
- Add Sprinkles: For extra festivity, sprinkle some colored candy sprinkles on top before the white chocolate sets.
- Make Them Mini: Use smaller scoops to create bite-sized pops that are perfect for little hands.
How to Make Mummy Pops
Step 1: Prepare the Brownie Mix
Start by preparing your brownie mix according to the package instructions. This step is crucial because it forms the base of our delicious Mummy Pops. If you’re short on time, feel free to do this part up to a day ahead!
Step 2: Bake the Brownies
Preheat your oven to 350 degrees F and spray your baking pan with cooking spray. Combine your brownie mix with egg, water, and canola oil in a large bowl. Pour into the prepared pan and bake until crispy on the edges but soft in the center—about 26-31 minutes. Let them cool for 30 minutes afterward; this makes handling them easier later on.
Step 3: Create Your Dough
Once cooled, remove the brownies from the pan and place them into a food processor. Don’t forget those crispy edges—save them for snacking! Add cream cheese and pulse until everything comes together like dough. This mixture will be molded into pops later.
Step 4: Forming Your Pops
Line your baking sheet with parchment paper. Using a 2-tablespoon scoop (or your hands), portion out balls of brownie dough onto the sheet. Aim for uniformity so they look super cute when finished! You should get about 15 pops.
Step 5: Freeze Your Pops
Cut paper straws in half and insert them into each brownie ball before freezing. This helps keep everything together while dipping them later. Freeze for at least one hour or overnight if you’re prepping ahead!
Step 6: Dip in White Chocolate
Melt your white chocolate according to package directions until smooth. Carefully dip each pop into the melted chocolate, coating all sides evenly before placing them back on the baking sheet. The longer they sit out, the quicker they’ll set!
Step 7: Decorate Like Mummies
To give these pops their mummy-like appearance, drizzle more melted white chocolate over each pop after they’ve set slightly—this creates that iconic wrapped effect! Add two mini chocolate chips as eyes before everything hardens.
Step 8: Chill Until Serving
Once decorated, keep your Mummy Pops covered in the refrigerator until you’re ready to serve. They’re sure to steal the show at any gathering!
Enjoy making these spooky yet scrumptious Mummy Pops—they’re bound to become a favorite treat!
Pro Tips for Making Mummy Pops
Making Mummy Pops is a fun activity that the whole family can enjoy, so here are some pro tips to ensure they turn out perfectly!
- Use quality chocolate: The flavor of your Mummy Pops largely depends on the quality of the white chocolate you use. Opt for high-quality chocolate chips or bars for a smooth and delicious coating.
- Don’t rush the cooling process: Allowing your brownie base to cool completely before forming the pops is essential. This prevents melting during the coating process and helps maintain their shape.
- Experiment with flavors: Feel free to mix in different extracts like vanilla or almond into your cream cheese filling for added flavor. It’s a great way to personalize your Mummy Pops!
- Get creative with eyes: Instead of mini chocolate chips, consider using candy eyes or other fun edible decorations for a spooky twist. This can make your Mummy Pops even more festive and appealing.
- Prep ahead: If you’re short on time, prepare the brownie base in advance and keep it stored in the fridge until you’re ready to form and dip your pops. This will save you time on the day of serving!
How to Serve Mummy Pops
These delightful Mummy Pops not only taste amazing but also make for an adorable presentation at any Halloween gathering! Here are some ideas on how to serve them up.
Garnishes
- Sprinkles: Add some colorful Halloween-themed sprinkles over the melted white chocolate drizzle for a festive touch.
- Chopped nuts: Consider sprinkling some finely chopped nuts such as almonds or pistachios around the base of the Mummy Pops for added texture and flavor.
- Chocolate sauce: Drizzle some dark or semi-sweet chocolate sauce around your serving plate for an elegant presentation that complements the sweetness of the pops.
Side Dishes
- Fruit platter: A colorful assortment of seasonal fruits like apples, grapes, and oranges offers a refreshing contrast to the richness of Mummy Pops and adds a healthy element to your dessert spread.
- Veggie sticks with dip: Carrot sticks, celery, and bell peppers served with hummus or ranch dressing create a crunchy, savory balance that keeps guests munching happily!
- Ghostly cupcakes: Bake some ghost-themed cupcakes topped with fluffy white frosting and cute little chocolate eyes. They will look great alongside your Mummy Pops while keeping with the Halloween theme!
- Cheese board: A selection of cheeses paired with crackers can make a lovely addition. Include some sharp cheddar and creamy brie along with dried fruits for an appealing contrast.
Now you have everything you need to create these adorable Halloween treats! Enjoy making Mummy Pops that will surely be the highlight of your spooky celebrations!

Make Ahead and Storage
These Mummy Pops are perfect for meal prep, allowing you to make them ahead of time for Halloween parties or festive gatherings. They store well, making it easy to whip up a spooky treat whenever you need!
Storing Leftovers
- Place any uneaten Mummy Pops in an airtight container.
- Store in the refrigerator for up to 5 days.
- Keep them separated with parchment paper if stacking to prevent sticking.
Freezing
- Before dipping in white chocolate, freeze the brownie balls on the baking sheet until solid.
- Transfer them to an airtight container or freezer bag.
- They can be frozen for up to 3 months; just thaw before dipping and decorating.
Reheating
- These pops are best enjoyed cold or at room temperature.
- If you’d like to soften them slightly, let them sit out for about 10-15 minutes before serving.
FAQs
Here are some common questions about Mummy Pops:
Can I make Mummy Pops without cream cheese?
Absolutely! You can substitute cream cheese with a dairy-free cream cheese alternative or even a nut butter for a different flavor profile.
How long do Mummy Pops last?
When stored properly in the fridge, Mummy Pops can last up to 5 days, making them a great treat for last-minute gatherings!
Are Mummy Pops suitable for kids?
Yes! Mummy Pops are fun and festive treats that both kids and adults will love during Halloween celebrations.
Can I use dark chocolate instead of white chocolate?
While white chocolate gives the best mummy appearance, you can certainly use dark chocolate if you prefer its flavor; just keep in mind it won’t have the same visual effect.
What is the best way to decorate Mummy Pops?
Drizzling melted white chocolate on top after dipping creates that mummy look. Use mini chocolate chips for eyes to bring your spooky creations to life!
Final Thoughts
I hope you enjoy making these delightful Mummy Pops! They’re not only simple but also a fantastic way to add some festive fun to your Halloween celebrations. Whether you’re whipping them up for a party or just for family fun, they’re sure to be a hit. Enjoy creating these spooky treats, and don’t forget to share your creations with friends and family!
Mummy Pops

Discover the joy of creating Mummy Pops, a fun and festive treat perfect for Halloween celebrations! These delightful dessert pops are made with rich brownie goodness and a creamy filling, all coated in smooth white chocolate. Not only do they look adorable, but they also offer an irresistible combination of textures and flavors that will impress both kids and adults alike. With their simple preparation steps, you can whip these up quickly and make them ahead of time for easy entertaining. Whether you’re hosting a spooky gathering or just want to brighten your family’s day, these Mummy Pops are sure to steal the show!
- Prep Time: 20 minutes
- Cook Time: 31 minutes
- Total Time: 51 minutes
- Yield: Approximately 15 servings 1x
- Category: Dessert
- Method: Baking
- Cuisine: American
Ingredients
- 1 (17.8-ounce) box brownie mix
- 1 large egg
- 1/4 cup water
- 1/3 cup canola oil
- 4 ounces cream cheese
- 3 cups white chocolate chips
- Mini chocolate chips for decoration
Instructions
- Prepare the brownie mix according to package instructions.
- Bake at 350°F until crispy on the edges, about 26-31 minutes. Let cool for 30 minutes.
- Blend cooled brownies with cream cheese in a food processor until dough-like.
- Form into balls on a lined baking sheet; freeze for at least one hour.
- Melt white chocolate and dip each pop, placing them back on the sheet to set.
- Drizzle additional melted chocolate over for mummy bandages; add mini chocolate chips as eyes.
- Chill until ready to serve.
Nutrition
- Serving Size: 1 serving
- Calories: 180
- Sugar: 15g
- Sodium: 50mg
- Fat: 9g
- Saturated Fat: 5g
- Unsaturated Fat: 3g
- Trans Fat: 0g
- Carbohydrates: 24g
- Fiber: 1g
- Protein: 2g
- Cholesterol: 10mg