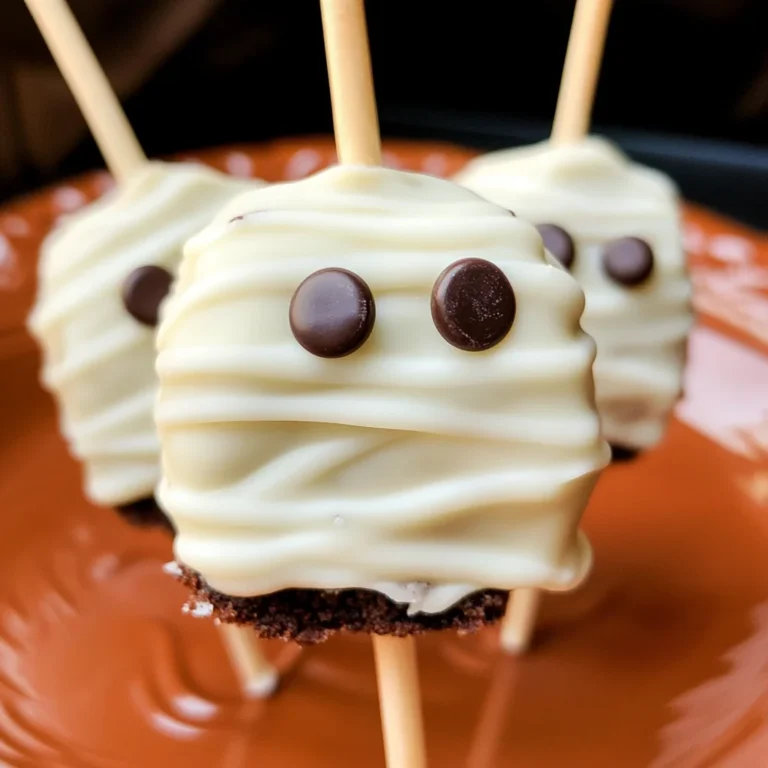
Monster Oreo Pops
If you’re looking for a fun and easy treat to make this Halloween, you’ve come to the right place! These Monster Oreo Pops are a delightful combination of chocolatey goodness and playful design that will bring smiles to faces of all ages. They’re perfect for school parties, family gatherings, or just a cozy night in with the kids. Plus, they require no baking—just some melting and decorating!
What I love most about these Monster Oreo Pops is how customizable they are. You can let your creativity shine by choosing different colors and designs! Whether you want scary monsters or silly ones, these pops are bound to be a hit.
Why You’ll Love This Recipe
- No-Bake Delight: These Monster Oreo Pops come together quickly without ever turning on the oven!
- Family-Friendly Fun: Kids will love helping out with the decorating, making it a perfect family activity.
- Endless Creativity: With different colors and candy eyes, you can create your very own spooky characters.
- Make Ahead: Prepare these treats in advance and store them in the fridge until it’s time to serve.
- Great for Any Occasion: While perfect for Halloween, these pops can brighten up any party or celebration!

Ingredients You’ll Need
Gathering your ingredients is half the fun! The best part? Everything you need is simple and wholesome. Here’s what you’ll need to whip up these delightful Monster Oreo Pops:
For the Pops
- 24 Double Stuffed Oreos
- ½ cup white chocolate melting wafers
For the Coating
- 12 ounces green candy melts
- 12 ounces purple candy melts
- 12 ounces orange candy melts
- 3 Tablespoons Crisco shortening (divided)
For Decoration
- Green, purple, and orange jimmy sprinkles (long not round)
- Candy eyes (multiple sizes)
- 24 Cake pop sticks
Variations
One of the best things about these Monster Oreo Pops is their flexibility! Feel free to get creative with your ingredients:
- Mix Up the Colors: Choose different shades of candy melts to match your party theme!
- Add Flavoring: A drop of mint or orange extract in the melting wafers can add a fun twist.
- Use Different Cookies: Try using lemon Oreos or another favorite cookie for a unique flavor.
- Change Up the Sprinkles: Use themed sprinkles like ghosts or pumpkins for extra festive flair!
How to Make Monster Oreo Pops
Step 1: Prepare the Cake Pop Sticks
Start by taking each cake pop stick and gently poke a hole about ½ inch deep into the Oreo filling. Be careful not to break the wafer—this step is crucial as it will help hold everything together when we dip them later!
Step 2: Melt the White Chocolate
In a small microwave-safe bowl, add the white chocolate melting wafers. Heat them at 50% power for 1 minute. Stir well, then return to the microwave for additional 30-second bursts until melted and silky smooth. This melted chocolate will act as glue for our cake pop sticks.
Step 3: Secure the Sticks
Dip the tip of each cake pop stick into the melted white chocolate (about ½ inch deep). Then carefully insert it into each Oreo where you made your hole earlier. This helps keep those sticks nice and secure while adding another layer of deliciousness!
Step 4: Melt Your Colorful Coatings
Now it’s time for fun! Place your colored melting wafers in small microwave-safe containers (glass tumblers work great). Heat at 50% power for about 1 minute. Stir with a fork, adding 1 tablespoon of Crisco to each container before returning them to heat in additional 30-second bursts until everything is smooth and silky.
Step 5: Dip Those Oreos!
Carefully dip each Oreo into one of your colorful coatings until it’s completely covered. It’s okay if you need to wiggle it side to side a bit; just let any excess chocolate drip off before moving on!
Step 6: Decorate Your Monster Pops
While the coating is still wet, immediately sprinkle on those colorful jimmies and place candy eyes however you like! Let your imagination run wild—these monsters can look spooky or silly depending on how you decorate them.
Step 7: Chill Before Serving
Place your decorated Monster Oreo Pops upright in a cake pop stand (or even a piece of Styrofoam works!) inside the refrigerator for about 30 minutes so everything sets nicely.
And there you have it—deliciously adorable Monster Oreo Pops that are sure to be a hit at any gathering! Enjoy sharing this special treat with friends and family.
Pro Tips for Making Monster Oreo Pops
Making these Monster Oreo Pops can be a delightful experience, especially with a few handy tips to ensure they’re perfect every time!
-
Use High-Quality Melting Wafers: Opting for good-quality melting wafers will give your pops a smooth and shiny finish, making them visually appealing as well as delicious.
-
Keep the Chocolate Warm: If your melted chocolate starts to thicken, simply reheat it in the microwave for a few seconds. This keeps the dipping process easy and helps achieve an even coat.
-
Experiment with Designs: Don’t be afraid to get creative with the sprinkles and candy eyes! Mixing different colors and sizes can lead to unique monster designs that kids will love.
-
Avoid Overheating Chocolate: Heating chocolate in short bursts prevents it from burning, which can ruin its texture. Stirring in between ensures an even melt.
-
Refrigerate Before Serving: Allowing the pops to chill not only helps them set but also makes them easier to handle when serving. Plus, they taste even better chilled!
How to Serve Monster Oreo Pops
These Monster Oreo Pops are not just fun to make; they are also delightful to present! Whether for a Halloween party or a fun gathering, you can create an eye-catching display that will wow your guests.
Garnishes
-
Edible Glitter: A sprinkle of edible glitter can add an extra layer of sparkle, making your pops shine under festive lighting.
-
Colored Candy Melts Drizzle: Use leftover colored melts to drizzle over the pops for added flair. It creates a beautiful contrast and enhances their monster-like appearance.
Side Dishes
-
Fruit Skewers: Fresh fruit skewers provide a refreshing contrast to the sweetness of the Oreo pops. Choose colorful fruits like strawberries, grapes, and pineapple for a vibrant presentation.
-
Veggie Platter: Serve a platter of crunchy veggies with hummus or ranch dip. The crunchiness balances out the sweetness of the pops and adds some healthy options to your spread.
-
Popcorn Mix: Create a sweet and salty popcorn mix by combining popcorn with candy corn or chocolate candies. This fun snack complements the Monster Oreo Pops perfectly while keeping things festive.
By incorporating these serving suggestions, you’ll elevate your Halloween dessert table into something truly memorable! Enjoy creating and sharing these delicious Monster Oreo Pops with friends and family.

Make Ahead and Storage
These Monster Oreo Pops not only make for a fun Halloween treat, but they are also perfect for meal prep! You can whip them up ahead of time and store them for later enjoyment.
Storing Leftovers
- Keep leftover Monster Oreo Pops in an airtight container at room temperature or in the refrigerator.
- Make sure to separate layers with parchment paper to prevent sticking.
- They will stay fresh for up to a week, but trust me, they probably won’t last that long!
Freezing
- To freeze, place each pop in a single layer on a baking sheet lined with parchment paper.
- Once frozen solid, transfer the pops into a freezer-safe bag or container.
- They can be kept in the freezer for up to 3 months. Just thaw at room temperature before enjoying!
Reheating
- There’s no need to reheat these pops since they are best enjoyed cold or at room temperature.
- If you prefer a softer texture, you can leave them out for 10-15 minutes prior to serving.
FAQs
Here are some common questions you might have about making Monster Oreo Pops:
Can I use regular Oreos instead of Double Stuffed Oreos for Monster Oreo Pops?
Yes, regular Oreos work fine! However, Double Stuffed Oreos provide extra creaminess that enhances the flavor and texture.
How do I make my Monster Oreo Pops look even more festive?
You can get creative with the decorations! Use different colored melting chocolates or add edible glitter alongside the sprinkles and candy eyes for extra flair.
Can I customize the colors of my Monster Oreo Pops?
Absolutely! Feel free to mix and match colors of candy melts based on your theme or personal preference. Halloween colors are just the beginning!
How long do Monster Oreo Pops last?
When stored properly in an airtight container, Monster Oreo Pops will stay fresh for up to a week at room temperature.
Final Thoughts
I hope this recipe brings joy and creativity to your kitchen! These Monster Oreo Pops are not just treats; they’re little bundles of fun that everyone will love making and sharing. Enjoy your time in the kitchen, and don’t forget to experiment with your designs. Happy popping!
Monster Oreo Pops

Get ready for a spooktacular treat with these Monster Oreo Pops! Perfect for Halloween or any festive gathering, these colorful and playful dessert pops come together without any baking. Simply melt some chocolate, dip Oreos, and unleash your creativity with fun decorations. Kids will love getting involved in the decorating process, making it a delightful family activity. Not only are they visually appealing, but they are also deliciously sweet with a satisfying crunch. Make them in advance and store them in the fridge for a perfect last-minute treat!
- Prep Time: 20 minutes
- Cook Time: 10 minutes
- Total Time: 30 minutes
- Yield: Makes approximately 24 Monster Oreo Pops. 1x
- Category: Dessert
- Method: No-Bake
- Cuisine: American
Ingredients
- 24 Double Stuffed Oreos
- ½ cup white chocolate melting wafers
- 12 ounces green candy melts
- 12 ounces purple candy melts
- 12 ounces orange candy melts
- 3 Tablespoons Crisco shortening (divided)
- Candy eyes and sprinkles for decoration
- 24 Cake pop sticks
Instructions
- Poke holes in each Oreo filling with a cake pop stick.
- Melt white chocolate wafers in the microwave and use to secure the sticks into the Oreos.
- Melt colored candy wafers mixed with Crisco until smooth.
- Dip each Oreo into the melted coating and decorate with sprinkles and candy eyes while wet.
- Chill in the refrigerator for about 30 minutes to set.
Nutrition
- Serving Size: 1 serving
- Calories: 150
- Sugar: 15g
- Sodium: 45mg
- Fat: 8g
- Saturated Fat: 4g
- Unsaturated Fat: 4g
- Trans Fat: 0g
- Carbohydrates: 18g
- Fiber: 0g
- Protein: 1g
- Cholesterol: 0mg