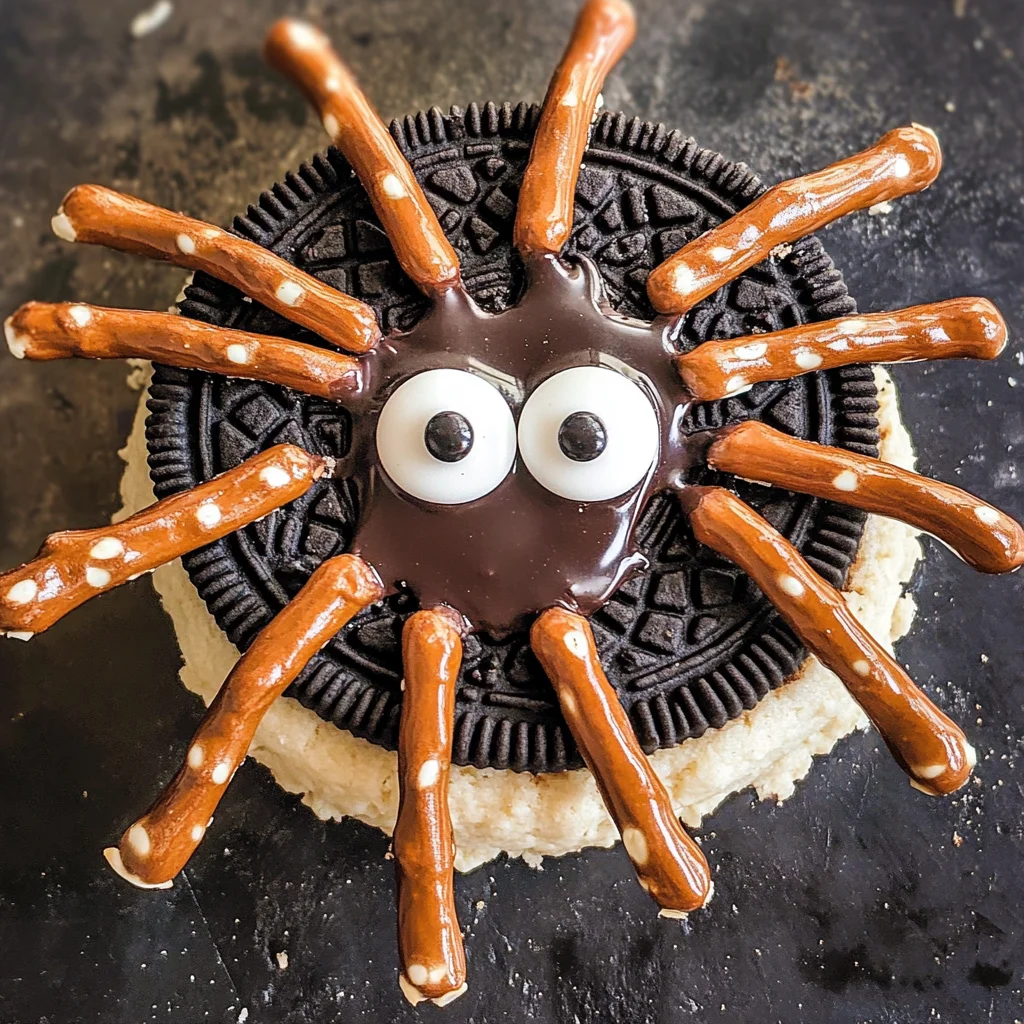
No Bake Oreo Spider Cookies
If you’re looking for a fun and festive treat to make with your kids, I have just the recipe for you! These No Bake Oreo Spider Cookies are not only adorable but also incredibly easy to whip up. They bring a smile to everyone’s face and are perfect for Halloween, school parties, or simply as a delightful dessert. The best part? You don’t need an oven or complicated tools!
This recipe is a family favorite in my home because it combines the classic flavors of Oreos and chocolate with the whimsical charm of spider decorations. It’s a fantastic way to get the little ones involved in the kitchen, making memories while creating delicious treats together.
Why You’ll Love This Recipe
- Super simple: With just a few ingredients, you can have a tasty treat ready in no time!
- Kid-friendly fun: Kids love to help with assembling these spooky cookies, making it a great bonding experience.
- No baking required: Perfect for those busy days when you want a quick dessert without the fuss.
- Customizable: You can easily adapt these cookies with different toppings or add-ins based on what you have at home.
- Deliciously satisfying: The combination of chocolate and Oreos creates a delightful treat that everyone will love.

Ingredients You’ll Need
Let’s gather our simple and wholesome ingredients that make these No Bake Oreo Spider Cookies so special. You probably have most of them at home already!
For the Cookies
- 12 Double Stuf Oreo Cookies
- 36 pretzel sticks
- ½ cup dark chocolate (or ⅓ of a 10oz bar, melted)
- Assorted candy eyes
- Jimmie sprinkles (red and white)
Variations
One of the best things about these cookies is how flexible they are! Feel free to get creative with your toppings and cookie styles. Here are some fun ideas:
- Change up the chocolate: Use white chocolate instead of dark for a different flavor profile.
- Add some crunch: Mix in crushed nuts or candies for added texture.
- Go seasonal: Switch up the Jimmie sprinkles with seasonal colors for different holidays.
- Make it gluten-free: Use gluten-free Oreo cookies to accommodate dietary needs.
How to Make No Bake Oreo Spider Cookies
Step 1: Prepare Your Workspace
Start by clearing off your counter or table. Gather all your ingredients and tools (like mixing bowls and spoons) so everything is within reach. This makes the process smoother and more fun!
Step 2: Melt the Chocolate
In a microwave-safe bowl, melt your dark chocolate until it’s smooth. Be sure to do this in short bursts of about 30 seconds so you don’t burn it. Melting chocolate is key because it acts like glue for assembling your spider cookies.
Step 3: Assemble the Spiders
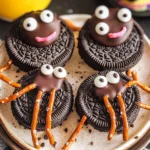
Take one Oreo cookie and dip three pretzel sticks into the melted chocolate before inserting them into each side of the cookie. This creates eight legs that give our spiders their charming look! Repeat this step for all cookies.
Step 4: Add Eyes and Sprinkles
While the chocolate is still warm, place two candy eyes on top of each cookie. Then sprinkle some red and white Jimmies around to add that special touch! This step is where creativity shines—get your kids involved in decorating!
Step 5: Let Them Set
Place your completed cookies onto a tray lined with parchment paper. Allow them to sit at room temperature for about 30 minutes or until the chocolate hardens completely. Patience is key here; this ensures that everything stays together when serving!
And there you have it—your very own batch of No Bake Oreo Spider Cookies! Enjoy sharing these spooky treats with friends and family; they’re sure to be a hit!
Pro Tips for Making No Bake Oreo Spider Cookies
Making No Bake Oreo Spider Cookies is a fun and simple activity that can create lasting memories with your little ones. Here are some pro tips to ensure your cookie spiders turn out perfectly every time!
-
Use Fresh Ingredients: Always check the expiration date on your Oreo cookies and chocolate. Fresh ingredients yield better flavor and texture, making the cookies even more delicious.
-
Melt Chocolate Carefully: When melting the chocolate, do it slowly in short bursts in the microwave or using a double boiler. This prevents scorching and ensures a smooth, drizzle-ready consistency that’s perfect for decorating.
-
Adjust Pretzel Lengths: If you want smaller or larger spider legs, feel free to break the pretzel sticks into different lengths. This customization adds a personal touch and can make each spider unique!
-
Keep Your Workspace Clean: Have all your ingredients organized and ready to go before starting. A tidy workspace makes the process smoother and keeps the kids engaged without distractions.
-
Chill Before Serving: After assembling, let the cookies chill in the fridge for about 30 minutes before serving. This helps everything set nicely and enhances the flavor!
How to Serve No Bake Oreo Spider Cookies
Presenting your delightful No Bake Oreo Spider Cookies can be just as fun as making them! Here are some creative ways to showcase these spooky treats for friends and family.
Garnishes
- Chocolate Drizzle: Add an extra touch of elegance by drizzling melted dark chocolate over the assembled cookies before they set.
- Candy Corn: Scatter some candy corn around your serving platter for a festive look that complements Halloween-themed gatherings.
Side Dishes
- Fruit Platter: A colorful assortment of fruits such as grapes, strawberries, and apple slices provides a refreshing contrast to the sweetness of the cookies.
- Popcorn: Serve up a bowl of seasoned popcorn (like cheese or caramel) for a crunchy side that balances out the soft texture of the cookies.
- Veggie Sticks with Dip: Pairing some fresh veggie sticks (carrots, cucumbers, bell peppers) with hummus or ranch dip offers a healthy option alongside your sweet treats.
- Ice Cream: A scoop of vanilla or chocolate ice cream can elevate dessert time, providing a creamy contrast to the crunchy cookie spiders.
By combining these serving suggestions with your No Bake Oreo Spider Cookies, you’ll create an unforgettable treat that’s perfect for any occasion! Enjoy making these adorable goodies with family or friends; they are not just tasty but also bring smiles to everyone around!
Make Ahead and Storage
These No Bake Oreo Spider Cookies are not only a fun treat to make with kids, but they’re also perfect for meal prep! You can easily whip them up in advance and store them for whenever that sweet craving hits.
Storing Leftovers
- Store your cookies in an airtight container at room temperature.
- They will stay fresh for up to 3 days.
- If you want to keep them longer, consider freezing them (see below).
Freezing
- Place the cookies in a single layer on a baking sheet and freeze until solid.
- Transfer to an airtight container or freezer bag, separating layers with parchment paper.
- They can be frozen for up to 2 months.
Reheating
- There’s no need to reheat these cookies, as they are best enjoyed chilled or at room temperature!
- If frozen, allow them to thaw in the refrigerator for a few hours before serving.
FAQs
Here are some common questions about making No Bake Oreo Spider Cookies!
Can I use regular Oreos instead of Double Stuf?
Yes! While Double Stuf Oreos add extra creaminess, regular Oreos will work just fine. The cookie structure remains the same.
How do I make No Bake Oreo Spider Cookies without chocolate?
You can substitute melted coconut oil or dairy-free chocolate chips if you prefer an alternative to dark chocolate. They’ll still taste delicious!
How long do No Bake Oreo Spider Cookies last?
When stored properly, these cookies can last up to 3 days at room temperature or up to 2 months in the freezer.
Can I customize the toppings on my No Bake Oreo Spider Cookies?
Absolutely! Feel free to get creative with different types of candies or sprinkles to add your personal touch.
Final Thoughts
I hope you’re feeling inspired to whip up these delightful No Bake Oreo Spider Cookies! They’re such a special treat that brings joy not just in their taste, but also in the fun of making them together with family and friends. Enjoy every bite and don’t forget to share these spooky delights with those you love. Happy baking!
No Bake Oreo Spider Cookies
If you’re searching for a fun and easy treat to make with your kids, these No Bake Oreo Spider Cookies are the perfect choice! Combining classic Oreo flavors with a whimsical spider design, this recipe is ideal for Halloween, school parties, or any festive occasion. With no baking required, you can quickly whip up these adorable cookies and enjoy quality time in the kitchen with your little ones. The simple assembly process allows for creativity, making it a delightful experience for everyone involved. So gather your ingredients and get ready to create some spooky smiles!
- Prep Time: 15 minutes
- Cook Time: None
- Total Time: 0 hours
- Yield: Makes approximately 12 cookies 1x
- Category: Dessert
- Method: No-bake
- Cuisine: American
Ingredients
- 12 Double Stuf Oreo Cookies
- 36 pretzel sticks
- ½ cup dark chocolate (melted)
- Assorted candy eyes
- Jimmie sprinkles (red and white)
Instructions
- Prepare your workspace by gathering all ingredients and tools.
- Melt the dark chocolate in short bursts in the microwave until smooth.
- Dip three pretzel sticks into the melted chocolate and insert them into each side of an Oreo cookie to create legs.
- While the chocolate is warm, place two candy eyes on top of each cookie and sprinkle with Jimmies.
- Let the assembled cookies sit at room temperature for about 30 minutes or until the chocolate hardens.
Nutrition
- Serving Size: 1 cookie (30g)
- Calories: 140
- Sugar: 10g
- Sodium: 50mg
- Fat: 7g
- Saturated Fat: 3g
- Unsaturated Fat: 4g
- Trans Fat: 0g
- Carbohydrates: 19g
- Fiber: 0g
- Protein: 1g
- Cholesterol: 0mg